
In the previous guide, we walked through accepting stablecoins payments and integrating AML checks into your app using our wallets and webhooks. Now, let’s take it one step further by enabling you and your users to swap or bridge assets directly from the Blockradar wallet.
With Blockradar’s Swap API, you can:
- Swap between different assets on the same blockchain (e.g., USDC → USDT on Base)
- Bridge assets between different blockchains (e.g., USDC on BSC → USDC on Optimism)
The beautiful part? You don’t have to worry about whether it’s a swap or a bridge; Blockradar intelligently determines that from the assets you specify. The endpoint is the same for both.
The Use Case
Imagine one of your customers is a business in Brazil. They have USDC on the BNB Chain but need to pay a supplier in Japan who only accepts USDC on Optimism.
With Blockradar’s API, this transaction can be seamless:
Get a Swap Quote: The business initiates the transaction, seeing the amount they’ll receive, fees, and estimated time.
Execute the Swap/Bridge: You can use Blockradar’s API to bridge the funds from BNB Chain to Optimism without any user involvement in the technical details.
This simplifies cross-chain transactions, reducing friction, cutting costs, and delivering a smooth user experience that helps businesses scale quickly.
Step 1: (Optional) Create Master Wallets for the Blockchains
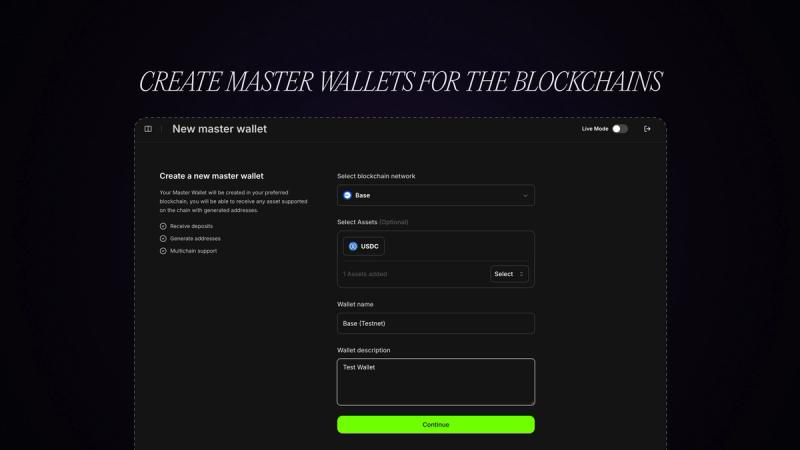
You can skip this if you already have master wallets created for the blockchains you want to swap or bridge between.
To create one:
From your dashboard, click Create Master Wallet.
Select the blockchain (e.g., BNB Smart Chain Mainnet).
Name it (bnb-mainnet-wallet) and add a description if you like.
Click Create.
Repeat the process for the other blockchain you’ll be bridging to (e.g., Optimism Mainnet).
🔗 See the full list of supported blockchains here: https://docs.blockradar.co/essentials/integrations
Step 2: Get the Asset IDs
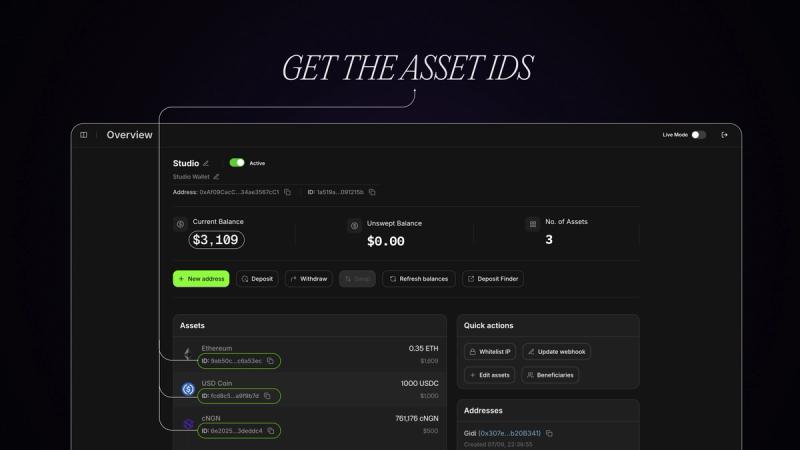
Every asset (like USDC, USDT, cNGN) inside a master wallet has its own Asset ID. You’ll need these for both the fromAssetId and toAssetId in your API calls.
To find them:
Go to your master wallet in the dashboard.
Scroll to the Assets section.
Copy the Asset ID for the token you’re swapping from and to from the different master wallet overview page.
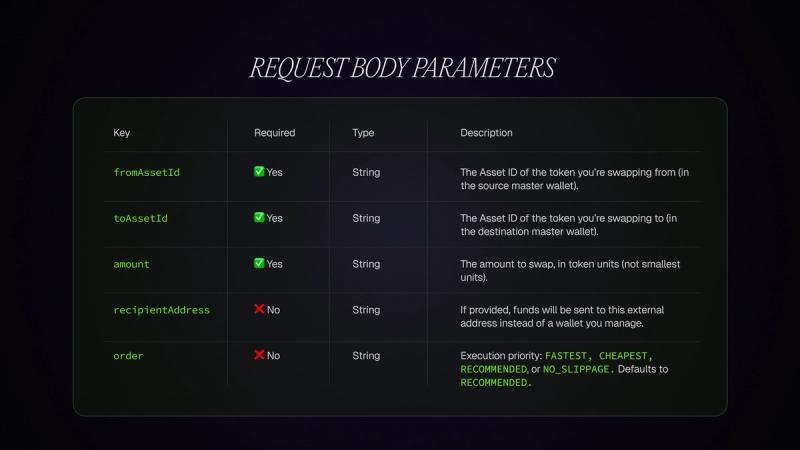
Step 3: Fetch a Swap/Bridge Quote
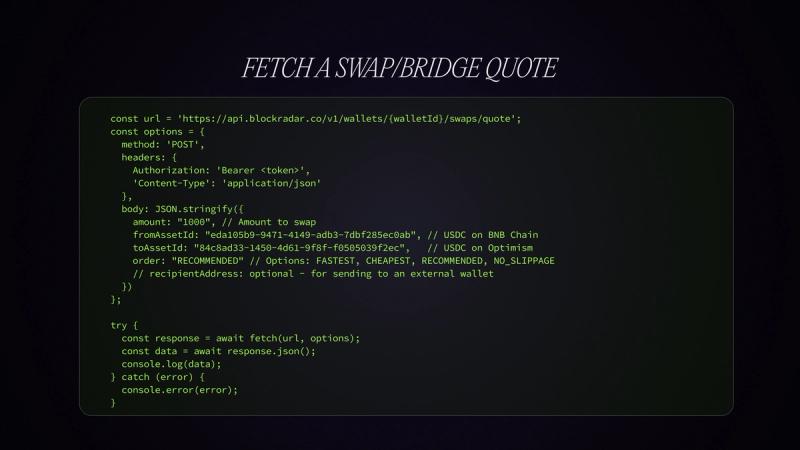
Before you execute a transaction, it’s best practice to get a quote. This lets you:
- Display what the user will receive.
- Show the fees and estimated arrival time.
- Let them choose whether to proceed.
Here’s how to get a quote:
const url = 'https://api.blockradar.co/v1/wallets/{walletId}/swaps/quote';
const options = {
  method: 'POST',
  headers: {
    Authorization: 'Bearer <token>',
    'Content-Type': 'application/json'
  },
  body: JSON.stringify({
    amount: "1000", // Amount to swap
    fromAssetId: "eda105b9-9471-4149-adb3-7dbf285ec0ab", // USDC on BNB Chain
    toAssetId: "84c8ad33-1450-4d61-9f8f-f0505039f2ec",   // USDC on Optimism
    order: "RECOMMENDED" // Options: FASTEST, CHEAPEST, RECOMMENDED, NO_SLIPPAGE
    // recipientAddress: optional - for sending to an external wallet
  })
};

try {
  const response = await fetch(url, options);
  const data = await response.json();
  console.log(data);
} catch (error) {
  console.error(error);
}
Request Body Parameters
💡 Tip: This endpoint works for both master wallet swaps and address-level swaps. For address-level access, simply replace `/wallets/{walletId}` with `/addresses/{addressId}` in the URL. The payload and response are the same.
Example Quote Response
{
  "data": {
    "amount": "999.208698",
    "estimatedArrivalTime": 30,
    "impact": "-0.08",
    "impactInUSD": "-0.791264",
    "minAmount": "989.208",
    "nativeBalance": "0.000857699568686543",
    "nativeBalanceInUSD": "1.56912705292928295678",
    "networkFee": "0.000090678936279694",
    "networkFeeInUSD": "0.16589348676624898524",
    "rate": "0.999208698",
    "slippage": "1.00",
    "transactionFee": 0
  },
  "message": "Swap quote fetched successfully",
  "statusCode": 200
}
Key Fields Explained
- amount – The estimated amount the user will receive after the swap/bridge.
- estimatedArrivalTime – Time (in seconds) until the funds should arrive.
- impact – Price impact percentage of the swap/bridge.
- impactInUSD – Price impact in USD terms.
- minAmount – Minimum amount the user should expect to receive (after slippage).
- nativeBalance – Current native token balance in the wallet performing the swap.
- networkFee – Gas/network fee in native token units.
- rate – Effective rate for the swap (toAmount / fromAmount).
- slippage – Allowed price movement percentage during the transaction.
- transactionFee – Additional service fee charged for the transaction.
You’ll typically want to display at least:
- Amount to receive
- Estimated arrival time
- Fees
If the user approves, move on to execution.
Step 4: Execute the Swap or Bridge
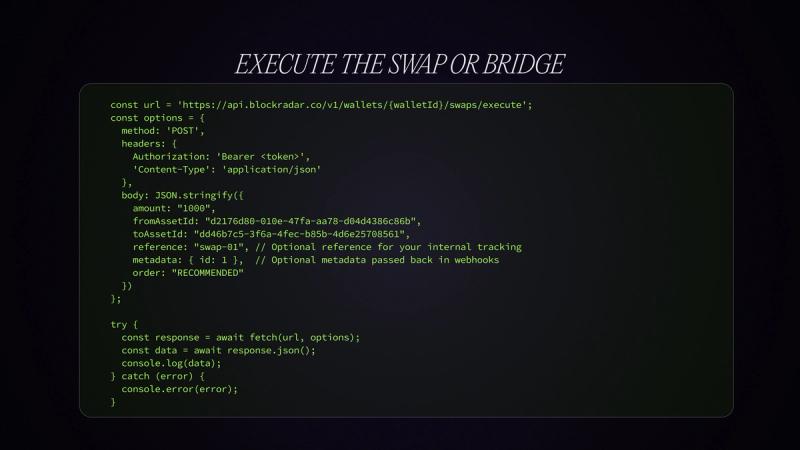
Once the user confirms the quote, you can execute the swap/bridge with:
const url = 'https://api.blockradar.co/v1/wallets/{walletId}/swaps/execute';
const options = {
  method: 'POST',
  headers: {
    Authorization: 'Bearer <token>',
    'Content-Type': 'application/json'
  },
  body: JSON.stringify({
    amount: "1000",
    fromAssetId: "d2176d80-010e-47fa-aa78-d04d4386c86b",
    toAssetId: "dd46b7c5-3f6a-4fec-b85b-4d6e25708561",
    reference: "swap-01", // Optional reference for your internal tracking
    metadata: { id: 1 },  // Optional metadata passed back in webhooks
    order: "RECOMMENDED"
  })
};

try {
  const response = await fetch(url, options);
  const data = await response.json();
  console.log(data);
} catch (error) {
  console.error(error);
}
⚠️ Just like with quotes, you can perform this at the address level by replacing /wallets/{walletId} with /addresses/{addressId}.
The execution response contains details of the initiated swap or bridge. You don’t need to parse all fields right away; you’ll be notified of the final status via webhooks.
Step 5: Tracking Swap/Bridge Completion
Blockradar sends webhook events to keep you updated on the transaction status. For swaps and bridges, you’ll see:
- swap.success – Swap or bridge completed successfully.
- swap.failed – Swap or bridge failed.
Make sure your webhook endpoint can:
Identify the user or wallet (using metadata you passed in address creation).
Update the user’s balance or status in your database accordingly.
Wrap-Up
With this setup, your application can:
- Swap between tokens on the same chain.
- Bridge assets between different blockchains.
- Do both from either a master wallet or a specific address.
- Handle fees, arrival times, and price impacts transparently for your users.
The process is always:
Get a quote → Show the user.
Execute → Trigger the transaction.
Track via webhooks → Update balances on completion.
Next in our Getting Started Series, we’ll dive into a more advanced topic of Custom Smart Contracts: how they work and when to use them.
About Blockradar
Blockradar provides secure, developer-friendly stablecoin infrastructure for fintechs. Our non-custodial wallet APIs, transaction monitoring, and AML compliance tools make it easy to launch and scale stablecoin-powered financial services. From USDC and USDT payouts to onchain expense management, we help companies move money instantly and safely across borders—without building blockchain infrastructure in-house.
Blockradar is trusted by payment platforms, remittance providers, and Web3 startups building the future of finance.
Explore our API documentation and get started at https://blockradar.co