

If you're building a fintech that needs to support stablecoins, whether for cross-border payouts, treasury management, savings products, or user wallets, Blockradar is the fastest way to go live without needing to learn blockchain. You can integrate and go live in less than 2 hours with 1 developer, see here for a live demo.
In this guide, you’ll learn how to integrate stablecoin payment collection using Blockradar’s infrastructure. We’ll go step-by-step, from account setup to wallet creation, webhook handling, and updating user balances after a successful deposit.
Blockradar is designed specifically for fintechs who want to launch or scale stablecoin-based products. Beyond just receiving payments, in a single API, it lets you:
- Set up programmable wallets for your users, merchants, or treasury needs — all non-custodial, secure, and compliant.
- Accept and send stablecoin payments across major chains like Ethereum, Base, Polygon, and Avalanche.
- Abstract away crypto UX with chain-agnostic balances, gasless transactions, and support for multiple assets under one UI.
- Auto-sweep funds into master wallets for better treasury control and settlement.
- Create smart payment links for invoicing or checkout experiences — no wallet address required.
- Build custom smart contract workflows for escrow, rewards, or payouts.
- Monitor onchain activity in real time with webhooks and metadata support.
- Enable asset recovery and address whitelisting to reduce friction and prevent errors.
- Integrate swaps and bridges to offer even more flexible user flows.
This is a follow-along tutorial, so feel free to build as you read.
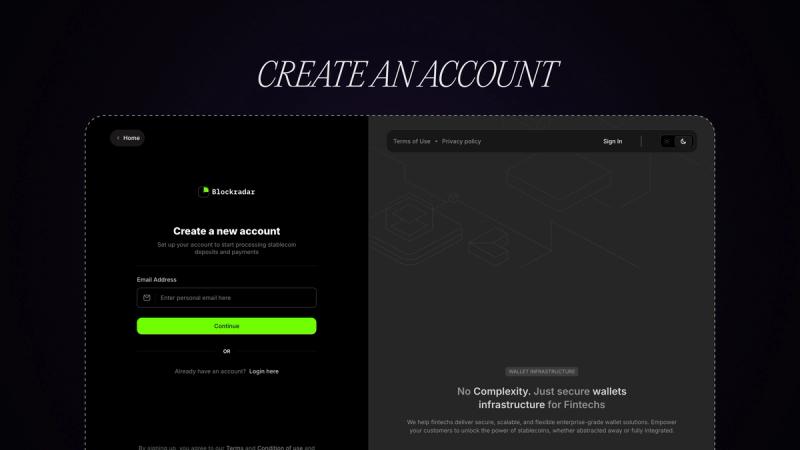
Step 1: Create an account on Blockradar
- Visit https://dashboard.blockradar.co/signup and complete the onboarding process (< 60 secs).
- You'll be redirected to the dashboard. The first page you’ll see is the wallets page, where all your master wallets will be listed once created
📌 Note: In the top-right corner of the dashboard, you'll see a Live Mode toggle. It’s off by default, meaning every action you perform is on the testnet (a safe environment for testing your integration before going live). This is great for development and doesn’t require real funds.
Step 2: Understanding and Creating a Master Wallet
What is a Master Wallet?
Within Blockradar, the Master Wallet is the foundational piece of your stablecoin infrastructure. Think of it like your treasury or vault; it holds control over all the child wallets or addresses you create for your users.
Each Master Wallet is tied to a specific blockchain. So, if you want to support deposits on multiple blockchains like Ethereum, Base, or BNB Chain, you’ll need to create a separate master wallet for each of those.
You can view the list of supported chains here:🔗 https://docs.blockradar.co/essentials/integrations
📌 Note: This page also shows both mainnets and testnets. Since Live Mode is off by default, we’ll focus on the testnet version.
Create a Master Wallet (an example on Base)
Let’s create a master wallet for the Base Testnet blockchain:
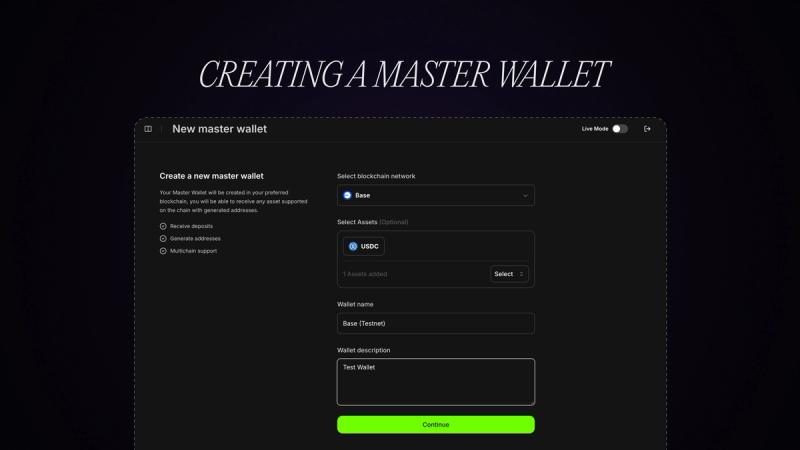
- From the Wallets page, click on “Create Master Wallet.”
- In the dropdown, select Base (Testnet)
- Give your wallet a name, e.g., base-testnet
- Optionally, you can write a short description
- Click Create
Now you have a Master Wallet that allows you to generate child addresses on the Base testnet chain. This is where the actual wallet infrastructure begins.
Step 3: Generating Wallet Addresses for Users
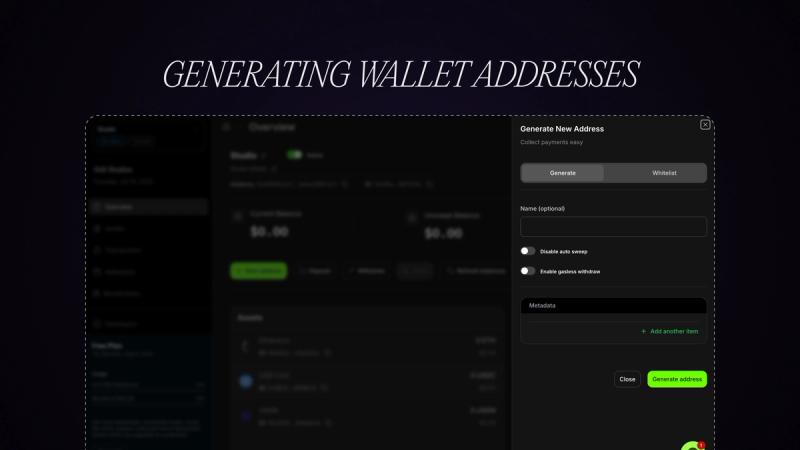
What are Child Addresses?
When you onboard a user into your app and you want them to be able to receive or hold stablecoins, they need a wallet address, like a bank account number, but on the blockchain.
Within Blockradar, these are called child addresses, and they're generated under your Master Wallet. Each one is tied to a specific blockchain (depending on the parent Master Wallet) and can be:
- Custodial: Meaning you can choose not to show your users their private key.
- Non-custodial: Meaning you can choose to show your users their private key, and they can manage this wallet outside your application.
In this guide, we’ll use the custodial approach to simulate a typical stablecoin wallet infrastructure where your users don’t need to manage seed phrases or private keys.
📌 Note: Addresses generated on Blockradar are multi-chain. This means if you generate an address on any EVM-compatible chain (e.g., Base), the same address can also receive assets from other EVM-compatible chains like Ethereum, BNB Smart Chain, Lisk, etc.
Generating the Address
When a user signs up on your platform, you can call the following Blockradar API to generate a child address for them:
const options = {
  method: "POST",
  headers: {
    "x-api-key": "<api-key>",
    "Content-Type": "application/json",
  },
  body: JSON.stringify({
    disableAutoSweep: true, // Explained later
    enableGaslessWithdraw: true, // Explained later
    metadata: { user_id: 1234, email: "[email protected]" },
    name: "Customer Wallet",
  }),
};

fetch("https://api.blockradar.co/v1/wallets/{walletId}/addresses", options)
  .then((res) => res.json())
  .then(console.log)
  .catch(console.error);
Let’s break this down.
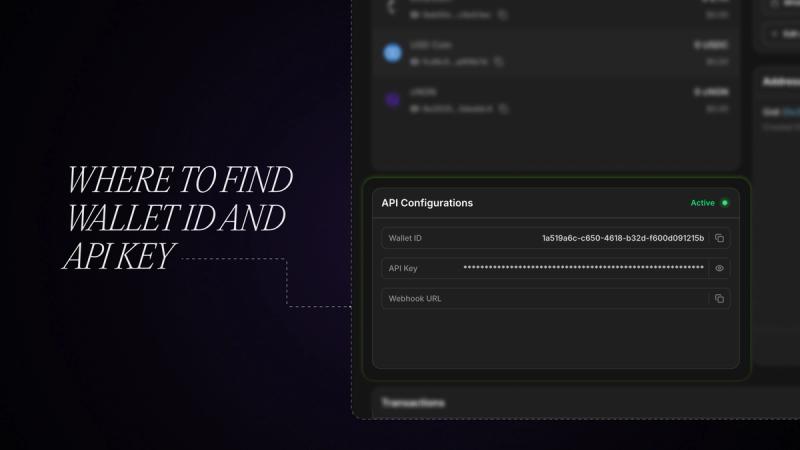
🔑 Where to get `walletId` and x-api-key
To find these values:
- Go to your Master Wallet in the dashboard.
- You’ll land on the wallet overview page.
- Scroll down to the API Config section.
- Click the icon to reveal your API Key (you’ll need to pass 2FA).
- Your walletId will also be shown in the same section.
These are unique to each master wallet, so if you support multiple chains, you’ll have a different API key and ID for each one.
One critical part of the request body here is metadata; you must pay close attention to this property, and here is why:
The metadata object is one of the most important tools you have when using Blockradar. It allows you to attach any user-specific information to the wallet address you're creating.
That means whenever Blockradar sends you a webhook (e.g., for a deposit or withdrawal), it will include that same metadata, making it easy for your backend to identify the user, reconcile transactions, and update balances.
For example:
metadata: {
  "user_id": 1234,
  "email": "[email protected]",
};
You can include anything in here:
- user_id
- customer_reference
- account_type
- Anything else that helps tie the wallet address back to your internal user system
Best practice: Always include a user ID in the metadata to ensure clean mapping between deposits and your database users.
Step 4: Auto Sweeping & Gasless Withdraw
Let’s talk about two other powerful configuration options for generated addresses.
What is Auto Sweeping?
By default, when a user receives funds into their child address, the money stays there.
But in some applications, it’s more efficient for you to centralize all funds into your master wallet (i.e., your treasury). That way, you can keep track of all user balances in your database and just hold the funds centrally.
To enable that behavior, set disableAutoSweep: false when generating the address.
Here’s what happens:
- A user sends funds to their address.
- Blockradar detects the deposit.
- It sends a webhook to your backend notifying you.
- It then automatically sweeps the funds into your master wallet address, using gas sponsored by you.
⚠️ For this to work, your master wallet must have some native tokens on the chain:
- ETH for Ethereum or Base
- BNB for BNB Chain
- MATIC for Polygon
- SOL for SolanaTRX for Tron
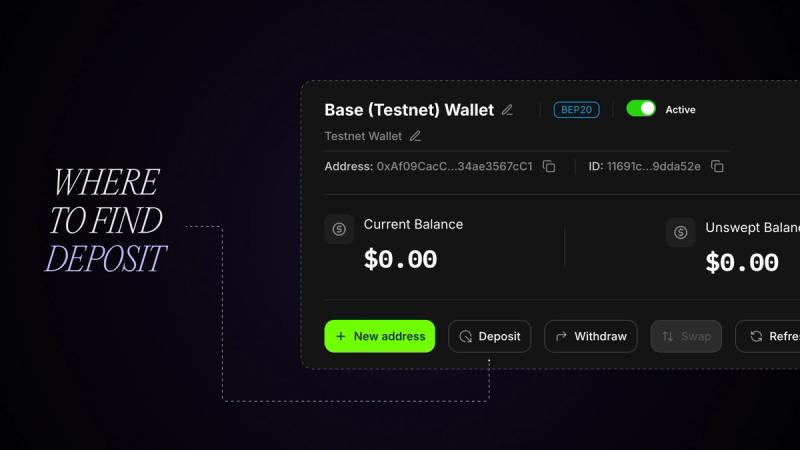
You can find the deposit address for your master wallet at the top of the overview page and send native tokens there.
Note: If you are just starting out, and you need test tokens to use on the testnet to test the application.
What is testnet?
A testnet is like a practice version of a blockchain where you can build, test, and experiment without using real money. In the traditional sense, think of it as a sandbox. Everything works the same as the main blockchain, but the tokens on a testnet have no real value, so you can safely try things out. To interact with the network such as sending transactions or testing payments, you need these free “practice tokens". That’s where faucets come in. A faucet gives you small amounts of testnet tokens so you can experiment freely before moving your product to the real mainnet network.
Below is a list of trusted faucets where you can get these free practice tokens. You’ll use them to test transactions, gas fees, and other blockchain features on testnet without spending real money:
Network Gas Tokens
- Ethereum - ETH - 🔗 https://www.alchemy.com/faucets/ethereum-sepolia, https://www.infura.io/faucet/sepolia
- BNB Smart Chain - BNB - 🔗 https://www.bnbchain.org/en/testnet-faucet
- Polygon - MATIC - 🔗 https://faucet.polygon.technology/
- Base - ETH - 🔗 https://www.alchemy.com/faucets/base-sepolia
- Optimism - ETH - 🔗 https://www.alchemy.com/faucets/optimism-sepolia
- Arbitrum - ETH - 🔗 https://www.alchemy.com/faucets/arbitrum-sepolia
- Tron - TRX - 🔗 https://nileex.io/join/getJoinPage
- Solana - SOL - 🔗 https://faucet.solana.com/
- Celo - CELO - 🔗 https://faucet.celo.org/alfajores
- Lisk - ETH - 🔗 https://console.optimism.io/faucet
- Avalanche - AVAX - 🔗 https://core.app/tools/testnet-faucet/
- Asset Chain - RWA - 🔗 https://faucet.assetchain.org/
- Arc - USDC - 🔗 https://faucet.circle.com/
Stablecoins
- Ethereum - USDC - 🔗 https://faucet.circle.com/
- BNB Smart Chain - USDT - 🔗 https://www.bnbchain.org/en/testnet-faucet
- Polygon - MATIC - 🔗 https://faucet.circle.com/
- Base - ETH - 🔗 https://faucet.circle.com/
- Tron - TRX - 🔗 https://nileex.io/join/getJoinPage
- Solana - SOL - 🔗 https://faucet.circle.com/
- Optimism - ETH - 🔗 https://faucet.circle.com/
- Arbitrum - ETH - 🔗 https://faucet.circle.com/
- Celo - CELO - 🔗 https://faucet.circle.com/
- Lisk - ETH - 🔗 https://docs.lisk.com/lisk-tools/faucets
- Avalanche - AVAX - 🔗 https://faucet.circle.com/
- Asset Chain - RWA - 🔗 https://faucet.assetchain.org/
- Arc - USDC - 🔗 https://faucet.circle.com/
What is Gasless Withdraw?
Normally, users need a small amount of native tokens (like ETH) to perform any transaction on the blockchain. But Blockradar allows you to sponsor this for them via gasless withdrawals.
If you set enableGaslessWithdraw: true, your users can send stablecoins like USDC from their address without needing to hold ETH.
You cover the gas fee from the master wallet, which is ideal for a great user experience.
Set Config Once (Globally)
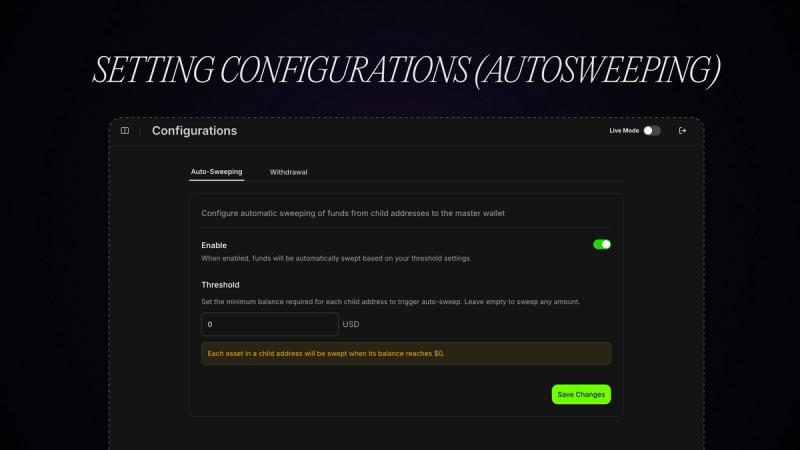
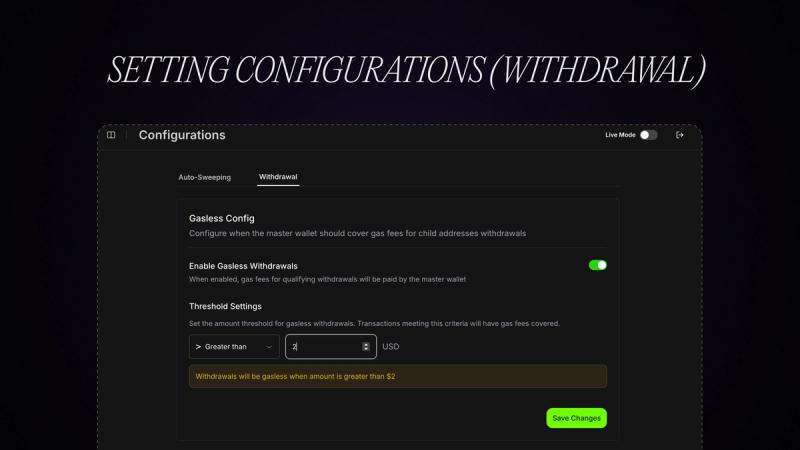
If you want all your generated addresses under a master wallet to follow the same rule (e.g., always sweep, always gasless), you can configure this globally:
- Go to your Master Wallet
- Click Configurations
- Set the values for disableAutoSweep and enableGaslessWithdraw
Important: Config set at the address level will override the master wallet config, so use that only when necessary.
Step 5: Webhooks: Listening for Blockchain Events
Blockradar uses webhooks to notify your backend when blockchain events happen. This is critical for building real-time stablecoin apps.
Tip: You’ll want to set this up early.
Setting Up the Webhook

- Go to your Master Wallet dashboard.
- Click Developer → Webhook
- Enter the full URL of your backend endpoint (MUST BE A POST endpoint), e.g., https://yourappapibaseurl.com/v1/webhook-handler
Here’s a simple Express.js backend handler:
app.post("/webhook-handler", (req, res) => {
  const event = req.body;
  // Handle event (e.g., check event type and update DB)
  console.log("Webhook received:", event);
  res.sendStatus(200);
});
Common Webhook Events
Some of the event types you may receive include:
- deposit.success
- withdraw.success
- swap.success
- deposit.swept.success
You can read the full list here: 🔗 https://docs.blockradar.co/essentials/webhooks
Step 6: Handling a Deposit Event
Let’s now focus on the event that matters for accepting stablecoin: deposit.success.
When a user sends USDC or any stablecoin to their wallet address, Blockradar will send a webhook to your backend.
Sample Payload:
{
    "event": "deposit.success",
    "data": {
        "amountPaid": "10.0",
        "currency": "USD",
        "senderAddress": "0x...",
        "recipientAddress": "0x...",
        "metadata": {
            "user_id": 1
        },
        ...
    }
}
How to Process It
- Extract metadata.user_id: This tells you which user sent the deposit.
- Use amountPaid to determine how much they sent.
- Update their balance in your internal database.
If Auto Sweep is enabled, the funds will already be in your master wallet, so you don’t need to worry about collecting them.
If you want to charge a deposit fee, simply subtract it from the amountPaid value before saving it to the user’s account.
You Now Have a Full Stablecoins Payment Flow
Let’s recap what you’ve achieved:
- ✅ Created a Blockradar account and test wallet
- ✅ Understood the purpose of master wallets and child addresses
- ✅ Generated addresses tied to users in your system
- ✅ Handled blockchain deposit notifications with webhooks
- ✅ Updated balances in your backend with event payloads
Where to Go from Here
- Add support for withdrawals (optionally with gasless)
- Explore swaps and on-chain compliance (AML checks)
- Move to Live Mode and begin accepting real funds
- Read the API reference for advanced use cases
Resources
- 📘 Full Documentation
- 🔗 Webhook Events
- ✉️ Reach out to the team at [email protected]
About Blockradar
Blockradar provides secure, developer-friendly stablecoin infrastructure for fintechs. Our non-custodial wallet APIs, transaction monitoring, and AML compliance tools make it easy to launch and scale stablecoin-powered financial services. From USDC and USDT payouts to onchain expense management, we help companies move money instantly and safely across borders—without building blockchain infrastructure in-house.
Blockradar is trusted by payment platforms, remittance providers, and Web3 startups building the future of finance.
Explore our API documentation and get started at https://blockradar.co